DrQ: Data-Regularized Q-Learning
Paper Link: ArXiv
Data-Regularized Q-learning (DrQ) is an off-policy deep reinforcement learning algorithm that applies data augmentation techniques to improve sample efficiency and generalization in pixel-based control tasks. It addresses the issue of overfitting and poor generalization that commonly occurs when applying Q-learning to high-dimensional visual inputs by applying multiple random transformations to input observations during training.
This table lists some general features about DrQ algorithm:
Features of DrQ |
Values |
Description |
|---|---|---|
On-policy |
❌ |
The evaluate policy is the same as the target policy. |
Off-policy |
✅ |
The evaluate policy is different from the target policy. |
Model-free |
✅ |
No need to prepare an environment dynamics model. |
Model-based |
❌ |
Need an environment model to train the policy. |
Discrete Action |
✅ |
Deal with discrete action space. |
Continuous Action |
❌ |
Deal with continuous action space. |
Algorithm Description
DrQ addresses the challenge of applying Q-learning to high-dimensional visual inputs by leveraging data augmentation. The main idea is to apply multiple random transformations to input observations during training to regularize the learning process and improve generalization. This approach helps reduce overfitting to specific visual patterns and makes the learned policy more robust to variations in the input observations.
The key insight is that by applying data augmentation, the Q-network learns to produce consistent Q-values for different augmented versions of the same observation. This consistency encourages the network to focus on the underlying semantic content of the observation rather than superficial visual features that may not be relevant to the task.
Network Architecture
The DrQ agent uses a convolutional neural network (CNN) as the backbone of the Q-network. The architecture typically consists of several convolutional layers followed by fully connected layers. The specific architecture can vary depending on the environment and task, but the core idea remains the same: to learn Q-values from pixel inputs using data augmentation as a regularizer.
Implementation Details
Data Augmentation
DrQ applies various data augmentation techniques to input observations during training. The specific augmentations used can vary, but common techniques include:
Random cropping
Color jittering
Random grayscale conversion
Horizontal flipping
The augmented observations are generated on-the-fly during training, and the Q-network is trained on these augmented samples.
Training Process
The training process of DrQ involves the following steps:
Collect experiences from the environment
Apply multiple random augmentations to observations
Update the Q-network using augmented observations
Periodically update the target network
The Q-network is trained using the standard TD-error loss with augmented observations: $\( \mathcal{L}_{\text{Q}} = \mathbb{E}[(Q(s,a) - (r + \gamma \max_{a'} Q'(s',a')))^2] \)\( where \) Q’ \( is the target network, \) \gamma \( is the discount factor, and \) r $ is the reward.
Multiple augmented versions of each observation are generated and used for training to improve robustness: $\( \bar{Q}(s,a) = \frac{1}{K} \sum_{k=1}^{K} Q(s_k,a) \)\( where \) K \( is the number of augmentations and \) s_k \( is the k-th augmented version of observation \) s $.
Key Features
Improved Generalization
By applying data augmentation, DrQ improves the generalization capability of the Q-network. The network learns to produce consistent Q-values for different augmented versions of the same observation, which encourages it to focus on the underlying semantic content of the observation rather than superficial visual features.
Sample Efficiency
DrQ improves sample efficiency by making better use of the available training data. By generating multiple augmented versions of each observation, the algorithm effectively increases the size of the training dataset without requiring additional environment interactions.
Robustness
The use of data augmentation makes the learned policy more robust to variations in the input observations. This robustness can be particularly important in real-world applications where the visual input may vary due to lighting conditions, camera angles, or other factors.
Advantages
Simple Implementation: DrQ is relatively simple to implement and can be easily integrated into existing Q-learning frameworks.
Effective Regularization: Data augmentation provides effective regularization that helps prevent overfitting.
Improved Performance: DrQ has been shown to significantly improve performance on pixel-based control tasks compared to standard Q-learning methods.
Application Scenarios
DrQ is particularly well-suited for:
Pixel-based control tasks where the agent must learn from high-dimensional visual inputs
Environments where sample efficiency is important
Applications where robustness to visual variations is desired
Algorithm
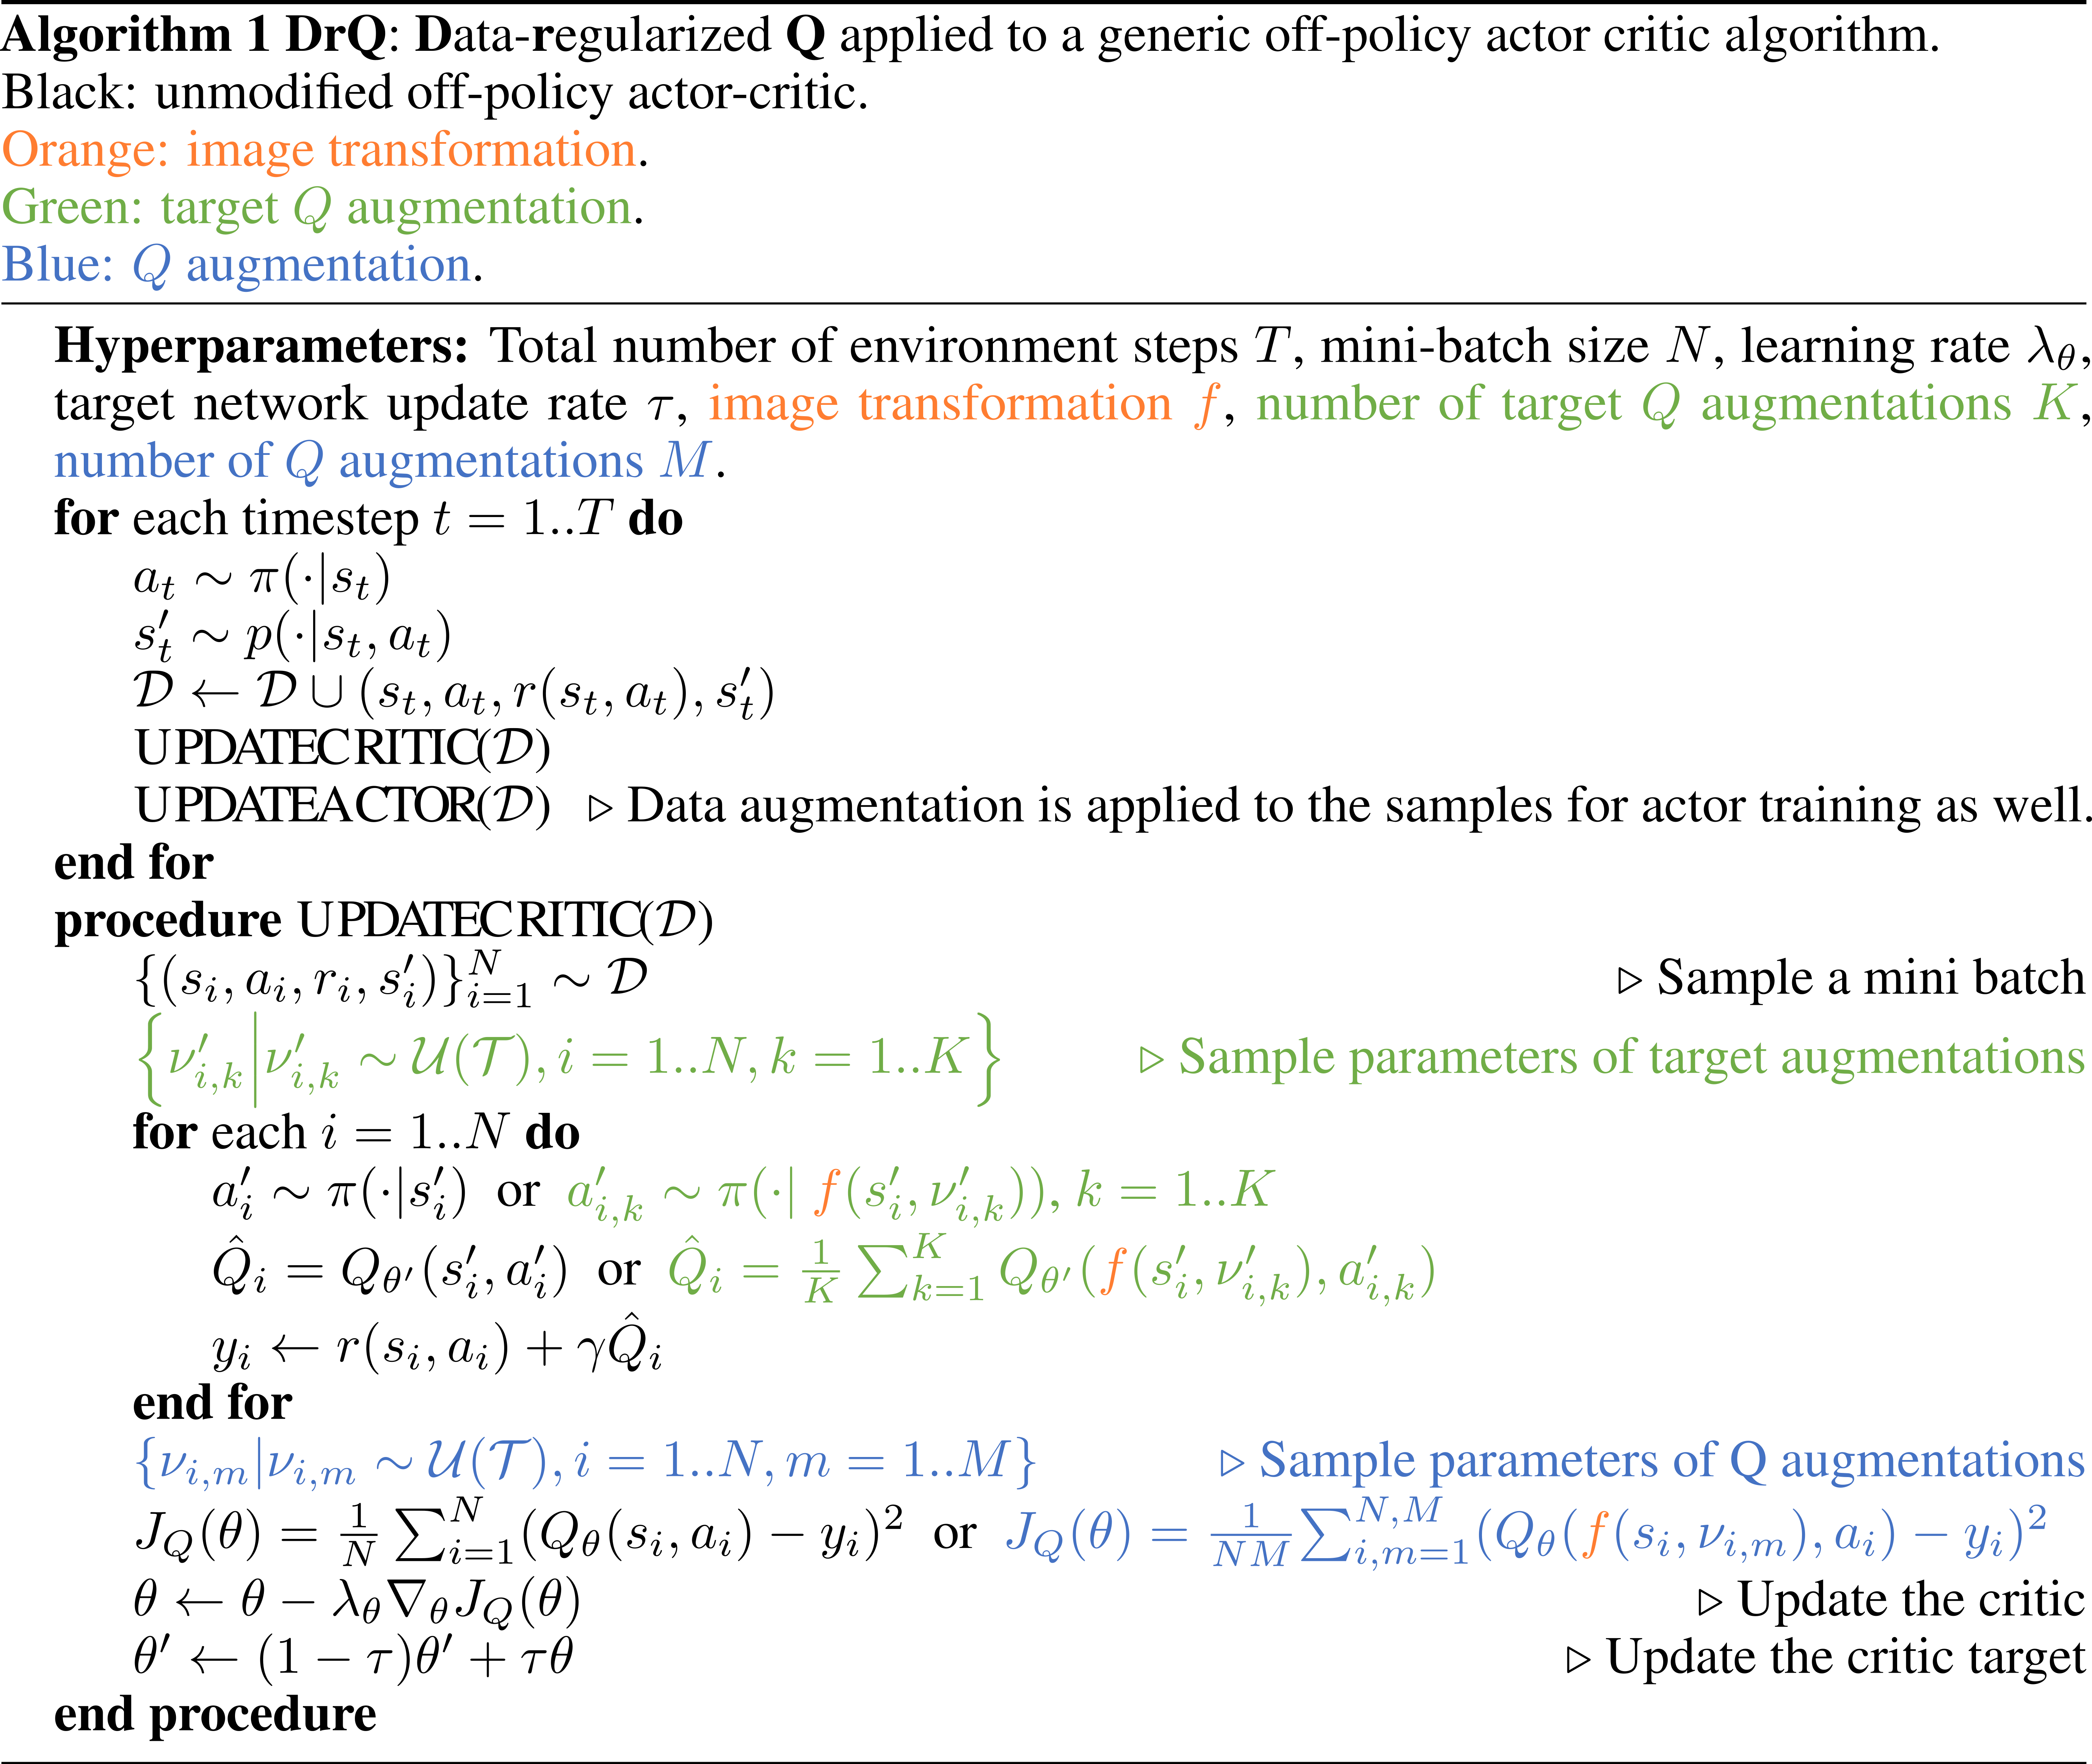
The full algorithm for training DQN is presented in Algorithm 1:
Run DrQ in XuanCe
Before running DrQ in XuanCe, you need to prepare a conda environment and install xuance following
the installation steps.
Run Build-in Demos
After completing the installation, you can open a Python console and run DrQ directly using the following commands:
import xuance
runner = xuance.get_runner(algo='drq',
                           env='atari',  # Choices: atari.
                           env_id='ALE/Breakout-v5',  # Choices: ALE/Breakout-v5, ALE/Pong-v5, etc.
                           )
runner.run()  # Or runner.benchmark()
Run With Self-defined Configs
If you want to run DrQ with different configurations, you can build a new .yaml file, e.g., my_config.yaml.
Then, run the DrQ by the following code block:
import xuance
runner = xuance.get_runner(algo='drq',
                       env='atari',  # Choices: atari.
                       env_id='ALE/Breakout-v5',  # Choices: ALE/Breakout-v5, ALE/Pong-v5, etc.
                       config_path="my_config.yaml",  # The path of my_config.yaml file should be correct.
                       )
runner.run()  # Or runner.benchmark()
To learn more about the configurations, please visit the tutorial of configs.
Citations
@article{yarats2021image,
  title={Image augmentation is all you need: Regularizing deep reinforcement learning from pixels},
  author={Yarats, Denis and Kostrikov, Ilya and Fergus, Rob},
  journal={arXiv preprint arXiv:2004.13649},
  year={2021}
}